 Yesterday I ruminated on the subject of this week’s blog post. I finally decided that it’s time to go over how to create a table of contents in Google Docs. This is more of an intermediate tutorial geared for those of you who are already well on your way with the app.
Why a table of contents?
There may be times when you have a long document split into different parts or chapters, such as a booklet or report. I personally don’t write really long multi-page assignments, but sometimes I’ll create one with multiple parts. One of the best ways to keep everything organized for you and your students is to have a table of contents at the beginning so that they can easily switch back to different sections.
First, a word on hierarchy
In any long document – including web pages – it’s easier for the reader to follow if you have a sense of structure that is signaled by headings. The size of the heading should correspond to the importance of the section, with the size decreasing with subordinate ones. For example, in my blog posts, I use a hierarchical structure with my tutorials:
Heading 1 size: main section
Heading 2 size: first sub-section
Heading 3 size: 2nd sub-section (if needed)
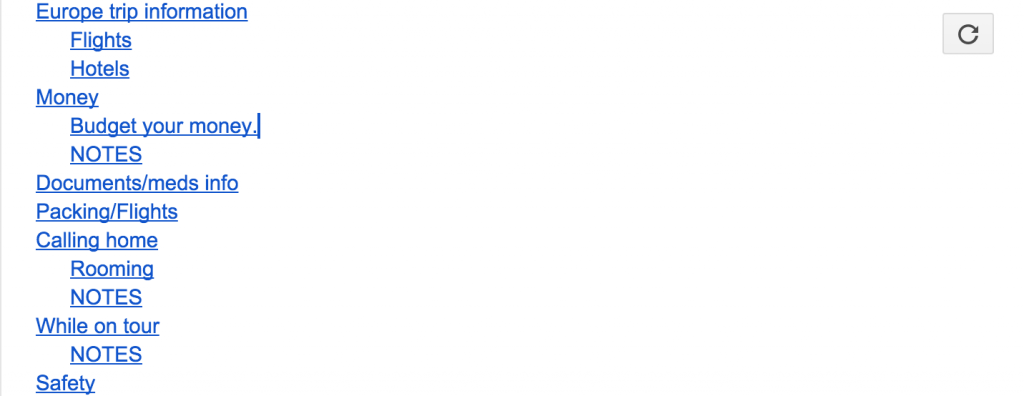
This distinction is crucial when creating a table of contents because the importance of the heading is delineated by the amount of indent:
NO indent (justified to the left) = more important
more indent = less important.
Also, the difference in heading and indents let readers know where to go, similar to a textbook.

In my blog posts, you can’t see this level of hierarchy with indents. However, I do this for accessibility reasons so that screenreaders and other assistive technology can read my pages properly.
Creating hierarchical headings
In Docs, to change the type of headings, go to the toolbar and click where it says “Normal text.” A dropdown menu will appear with your options.

- For major sections, you’ll want to use Heading 1. For sub-sections within, use Headings 2 and 3.
- After you’ve chosen your desired heading level, type in the name of that section. Next, press Return. The text will default back to Normal Text.
- If you’re creating a table of contents for a document that you’ve already created, you’ll need to go through and add or change the sizes of your headings so that they correctly appear in your table of contents.
Creating the table of contents
Once you’ve set your first few headings, it’s time to create the table of contents. I typically like mine separate from the rest of the document, so I need to move everything down one page.
- Go to the first page and place your cursor at the very beginning.
- At the top menu, go to Insert>Page Break. This will move your document down.
- Next, place your cursor again at the top of the document. Change the heading type to “Title,” and then type “Table of Contents.” Press Return.
- Go to Insert>Table of Contents. It will appear on your page.
As you continue to write and add headings, your table of contents should update accordingly. If it doesn’t, click in the box that contains your table of contents. You’ll see a circular arrow at the right. Click on that, and the rest of the headings will appear.
An added bonus: a “back to the top” button
If you have pages and pages of text, it’s nice to provide a way for readers to go to the table of contents without scrolling. This is really simple!
- First, you need to create a bookmark to your Table of Contents. Put your cursor at the beginning of the word “Table.” Then go to Insert>Bookmark. A blue ribbon will appear beside it.
- Go to Insert>Footer
- When your cursor is in the footer (bottom of the page), click Insert>Link
- For Link, select “Bookmarks,” and then “Table of Contents.”
- Next to “Text,” change “Table of Contents” to “Back to the Top” (or whatever text you want here)
- Click Apply
You’ll see the text in blue and underlined. Anytime a reader clicks on this, they’ll be brought to your table of contents.
By the way, internal bookmarking and linking are really useful tools. For example, if you have a document with an appendix of forms, you can link to them so that users don’t have to scroll to the end. You’ll see something similar to websites that say “for more information, click here,” which will take you to a different page of that site.
Leave a Reply